Monday, February 13, 2012

The beet organic cafe


Welcome to The Beet Organic Cafe! Offering a taste of local, organic, and healthy eating to Toronto's Junction neighbourhood since 2008. Located at 2945 Dundas Street West, this corner street shop is a great find if you're looking for something fresh and wholesome to satisfy your tastebuds.  I ventured out to the Beet a few weeks ago with some friends, and was so impressed with both the service and quality of the food. Our server made too much of a smoothie I ordered, so our table got an extra glass. Their specials are posted online daily, and feature whatever locally grown and/or organic ingredients they can get their hands on. Next time I want to stay for dessert...I mean when else am I going to make Vegan Kamut Ginger Cookies??
12 oz "True Blue" smooth, blueberry, fair trade bananna - comes in soy,
almond, skim or whole milk
"Farm Fresh Eggs"  - 2 local organic eggs, cheddar cheese and 
spinach on a whole wheat english muffin, side of fresh fruit
Buenos Dios Wrap (avocado, spicy black bean, pico de gallo, and raw 
Quebec cheddar) and Soup du Jour
To be honest, can't quite remember what this was, but I'm almost positive
it's the "Huevos Rancheros" - 2 baked eggs with raw Quebec cheddar, sweet 
potato mash, topped with sour cream and avocado
If that doesn't win you over, owners Michelle Vella and Heather Osler have really gone over the top by creating this cafe in the most eco-friendly way possible - the Beet was constructed using recyclable materials, from flooring to cabinetry, and all of their packaging is 100% biodegradable. So if you're ever in the area (or even if you're not), drop in to the Beet and enjoy one of their many delightful dishes. (They have an organic wine and beer menu too..) 

Happy Monday!

A.C

Saturday, February 11, 2012

Prunes on a chicken? Heck yes


And no...it's not just so we can fulfil our daily dose of fibre. Although it may sound odd at first, when mixed together with capers, olives, oil, herbs, and baked with brown sugar and white wine, the chicken holds a sweet and savoury flavour like no other. This Chicken Marbella recipe is one of the best dishes to come from the Silver Palate cookbook, which any one with a remote interest in cooking and food-related experimentation should definitely check out (even Oprah says its great). 

Ingredients (10-12 servings):
4 chickens, 2 1/2 pounds each, quartered
1 head of garlic, peeled and finely pureed
1/4 cup dried oregano
coarse salt and freshly ground black pepper to taste
1/2 cup red wine vinegar
1/2 cup olive oil
1 cup pitted prunes
1/2 cup pitted Spanish green olives
1/ cup capers with a bit of juice
6 bay leaves
1 cup brown sugar
1 cup white wine
1/4 cup italian parsley or fresh coriander (cilantro), finely chopped

1. In a large bowl, combine chicken quarters, garlic, oregano, pepper and coarse salt to taste, vinegar, olive oil, prunes, olives, capers and juice, and bay leaves. Cover and let marinate, refrigerated, overnight.

2. Preheat oven to 350 degrees.

3. Arrange chicken in a single layer in one or two large, shallow baking pans and spoon marinade over it evenly. Sprinkle chicken pieces with brown sugar and pour white wine around them.

4. Bake for 50 minutes to 1 hour, basting frequently with pan juices. Chicken is done when thigh pieces, picked with a fork at their thickest, yield clear yellow (rather than pink) juice.

5. With a slotted spoon transfer chicken, prunes, olives and capers to a serving platter. Moisten with a few spoonfuls of pan juices and sprinkle generously with parsley or cilantro. Pass remaining pan juices in a sauceboat.
Baste frequently to ensure the chicken gets all of the juices
Serve on its own, or on a bed of rice
It's usually difficult for me to eat chicken unless its in a salad or a wrap because I find it tastes pretty dry. The overnight marinade is key for this recipe - it keeps the chicken moist and juicy no matter what piece you're eating. Best of all, you can keep it in the fridge for up to a week after, and the taste will probably only improve over time!

Happy Saturday!

A.C

Wednesday, February 8, 2012

Parsley pesto

So I had a ton of leftover parsley in the fridge and it was starting to go bad, so I thought hmm..what can I do with all this parsley?? Besides making a really herb-friendly tomato salad, I thought pesto was the perfect solution. I actually got this recipe from Rachel Eats, which is pretty awesome if any of you are looking for another foodie blog to follow.

What you'll need:
150 g flat leaf italian parsley (or however  much you have in your fridge that is starting to die)

50 g pine nuts

2-4 cloves of garlic

50 g grated parmesan or pecorino cheese

250 ml extra virgin olive oil

pinch of salt


This recipe is really easy to make, and takes about 20 minutes to prepare. Best of all, you can make a large quantity and keep it for the week!


1. Wash and dry the parsley very well, using a clean cloth. Separate the leaves from the stems, making sure to remove any yellow/already wilted ones.


2. Smash the garlic, crush the nuts, and add them to a food processor ( or a mortar and pestle if you have one) with a little bit of salt. Pulse the processor as you add the parsley leaves a little bit at a time, until you have a grainy green paste.


3. Transfer the paste to a bowl.  Pour the olive oil in a thin stream, stirring continuously with a wooden spoon. I found I didn't need to use all of the olive oil (maybe only 150 ml), likely because I didn't have that much parsley. 


4. Add the cheese and continue stirring. Taste and adjust seasoning - I added a bit more salt to mine.

5. Pesto will last in the fridge for a few days, but the sooner you eat it, the fresher it will taste. If you happened to have a LOT of extra parsley in the fridge and made a big batch, store half of it in the freezer until you're ready to serve. For one portion of pasta, about 2 tbsp of pesto will suffice. It may not look like a lot but pesto has a very strong taste, so don't over power your meal.

Parsley pesto on angelhair pasta
I think pesto works best with thin pastas, like angel hair or spaghetti, but since I live alone and didn't want to eat pasta for 3 days straight, I found some other uses for this concoction. 

1) Use as a marinade or rub on chicken breast or white fish

2) Spread over a baked baguette as a garlic bread substitute

3) Use it as a pizza sauce! Sounds odd but it's great for a veggie pizza with sun dried tomatoes and fetta, or even with some sliced chicken

Although pesto is usually made with basil, I really liked the parsley twist. Think of the pesto formula as "herb + nut + cheese + garlic + oil = pesto". The ingredients can be changed as long as they fall into one of those categories. Feel free to try it with cilantro instead of parsley, or with walnuts instead of pine nuts. I think my next venture will be to try it with rosemary or oregano....

Happy Hump Day!

A.C

Monday, February 6, 2012

Super Bowl! An excuse to make food!


the Mufaletta

Even though I don't watch football and have no real interest in the Super Bowl (half time show excluded), I do enjoy the fact that this, like most other major sporting events, supports the need to make lots of delicious, hearty, and filling foods. I know the menu usually consists of hot wings, nacho dip, chili, etc., but this year I decided to try something different. Low and behold, the Mufaletta. Yes, you heard right - Mufaletta! Essentially, an extremely large sandwich with different meats and cheeses layered into a scooped out bread bowl. How can you go wrong with a sandwich?? Or should I call it...the man-wich...

Ingredients
loaf of rustic french bread
olive tapenade (store-bought, or homemade if you have time)
sliced deli meats (whichever you like - I used mortadella, turkey, and capicola)
sliced cheeses (again, whatever you like - I used havarti and provolone)
sliced red onions
spinach or fresh basil

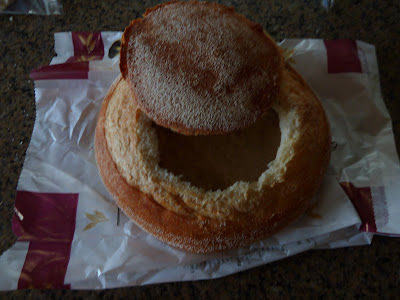
Slice off the top of the load and pull out the innards. Similar to
carving a pumpkin, only with dough.
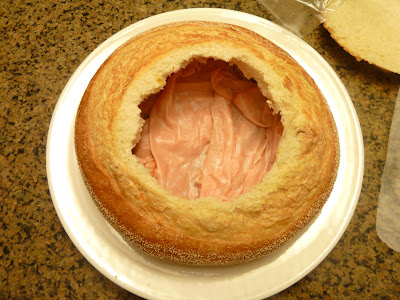
Spread a thin layer of tapenade on the bottom of the bread bowl.
Spread your first layer of meat - Mortadella
Spread your first layer of cheese - Havarti
Second layer of meat - Turkey
Second layer of cheese - Provolone
Layer of spinach, red onions and a few basil leaves
And so on and so forth. Continue layering until you've filled the bowl,
then finish with a  final layer of tapenade. I think mine got to 12 or 13 layers...
Put the top of the loaf back on, slice the mufaletta down the middle and voila!
Attempt to eat the man-wich!

Mufaletta's are awesome because you can mix and match different types of meat and cheese. Next time I would add a layer of sun dried tomatoes, roasted red peppers, and pickles into the mix.

Happy Mufaletta Monday!

A.C

Related Posts Plugin for WordPress, Blogger...